"The gearbox deserves high praise
because the synchromesh action is particularly effortless and rapid."
"The change from top to third demands simply declutching and pushing
the lever straight through."
How often have you read pre-war SS road tests and thought ,
how uncritical the testers were?
In the three years that I have had my SS Jaguar on the road I have
always suspected that the
synchromesh action was never very effective even when new. Consequently
I persuaded myself that
the effort of restoring it would be less than worthwhile. How wrong I
was.
I decided to have a go, not because I objected to double
declutching on downward changes but because
of the slowness of making upward changes without 'snicking' the gears.
In our gearboxes the main and layshaft
gear sets, for second and third, run in mesh regardless of the gear
selected and the mainshaft cogs not selected
are allowed to rotate freely at their own speed. When a particular gear
is required the selector locks the chosen
cog to the mainshaft with a dog clutch and this clutch can
only be engaged when the mating dog teeth are rotating
at the same speed.
In synchromesh boxes a cone clutch is used to force the
chosen cog to rotate at the mainshaft's speed and allow
the dog clutch to lock it to the shaft. The effectiveness of
the cone clutches and the consequent effectiveness of the
synchromesh depends on two ingredients: One, the quality of the
friction surfaces and two, the pressure applied to the cones.
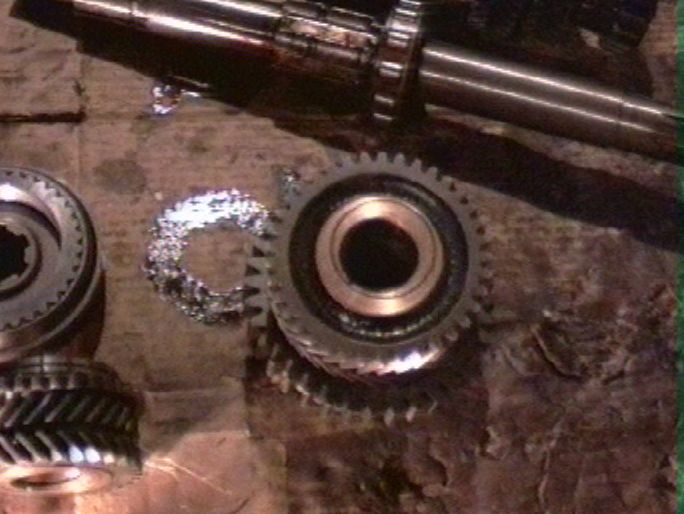
With my gearbox I found that weak synchromesh resulted from
deterioration in both departments. The cones were nicely
polished and slippery and the springs in the synchro hubs were not
exerting enough pressure. My rather thin workshop
manual gives no test for the springs in the synchro hubs but I found
that the Mark V manual is much more informative and
quotes 42-45 lbs pressure for the third and top gear synchro hub and
62-65 lbs for the second gear hub. All very well, but
I found on dismantling my old pre-war double helical box that the synchro balls and springs were 1/4" diameter as opposed
to the 5/16" of the later cars. Prior to dismantling I had obtained a
set of 5/16" balls and springs, misled by identical numbers
in the parts list for balls from early and late boxes.
I then found some
notes on repairing Standard gearboxes (with 1/4" springs)
quoting 42 lbs for third and top and 50 lbs for second. The
question now was, should my early box with its smaller springs
offer the same cone clutch pressure as the later boxes? My
quandary was knowing that stronger pressure would improve the
synchromesh but would increase the gear lever pressure required
for engagement. I figured that the mechancial advantage of the
gearlever in my box was very similar to the later boxes and
decided to match the Mark V pressure figures. (In retrospect my
assumption about the difference between SS and later gear
changes was wrong. The later cars have much longer fore and aft
gear lever travel than the SS and the increased leverage permits
the use of greater spring pressure.)
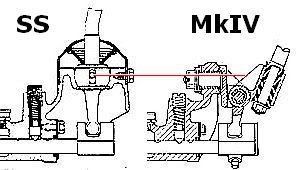
Comparison of fulcrum
points
(You can see from the above diagram that the Mark IV
cleverly separates the leverage for fore and aft travel from
that of travel across the gate. The red line represents the
single fulcrum point of the SS gear lever and you can see that
the centre line of the across gate leverage in the later cars
gives a slightly wider gate but the fulcrum for fore and aft
gives a very much longer lever travel.)
If guessing the original strength of individual springs
proved difficult our trusty bathroom scales came to the rescue
for pressure testing of the complete synchro hub assemblies. When
testing the hubs you need to limit their travel or the
sliding sleeve comes completely off the hub and tests your powers of
observation as you search for the balls and springs
which have flown in all directions. If you are doubtful about limiting
the sleeve travel then wrapping the hub in an old rag
saves much wasted time.
Having restored the clutch pressure, refacing the cone
surfaces is an easy if somewhat tedious process involving
grinding-in the cones with fine grinding paste. This is exactly the
same as grinding-in valves, but on a bigger scale, and
cleaning away all traces of grinding paste after the event is just as
important.
All in all the differences between my ineffective
synchro-mechanism before the job and that after seemed very small
and my first test drive after reassembly was one of profound distrust.
However, I am delighted to report that my distrust
has now turned into astonishment at the effectiveness of the mechanism
combined with slowly decreasing scepticism that
the wonderous qualities are here to stay.
Accelerating away is now a pleasure with no more feelings of
guilt stretching the compromise between a rapid upward
change and a nasty 'snick'. Even more amazing than my hoped
for silent upward changes is the silent downward change,
which is probably a more arduous test. The only limiting factor seems
to be self-confidence which is now building by the mile.
If you have weak synchromesh like I had then I thoroughly
recommend the above overhaul. It really is well worth the effort.
Those road testers were absolutely right.
A few other tips that I found useful:
In assembling a synchrohub a piston ring clamp is highly
effective for compressing and retaining the springs and balls.
After removing the front seats, floor boards, starter motor
and
N/S exhaust pipe the gearbox can be unbolted and slid back
off the engine. A static jack supports the rear of the engine and a
small trolley jack supports the gearbox.
If you spread the load with a hefty wooden block you can support the
engine by jacking under the rear of the sump and the alloy casing does
not collapse under the weight.
If you leave the clutch pedal in place it acts as a useful
handle
when manoeuvring the gearbox off the engine and onto the rear floor.
The short video below gives an impression of the
synchromesh operation after the overhaul in 1996.


.JPG)